


Pothos plant care is straightforward: give this adaptable houseplant bright, indirect light, water when the upper layer of potting mix dries, and grow it in an airy mix inside a pot with drainage holes. It tolerates lower light, but may grow less vigorously and lose some variegation.
A fixed weekly watering schedule is less reliable than checking the soil, and a few older yellow leaves do not automatically mean something is wrong. This guide explains how to distinguish normal aging from watering, light, root, or pest problems—and how to prune and propagate pothos without unnecessary treatments.
In This Article
How Much Light Does a Pothos Need?
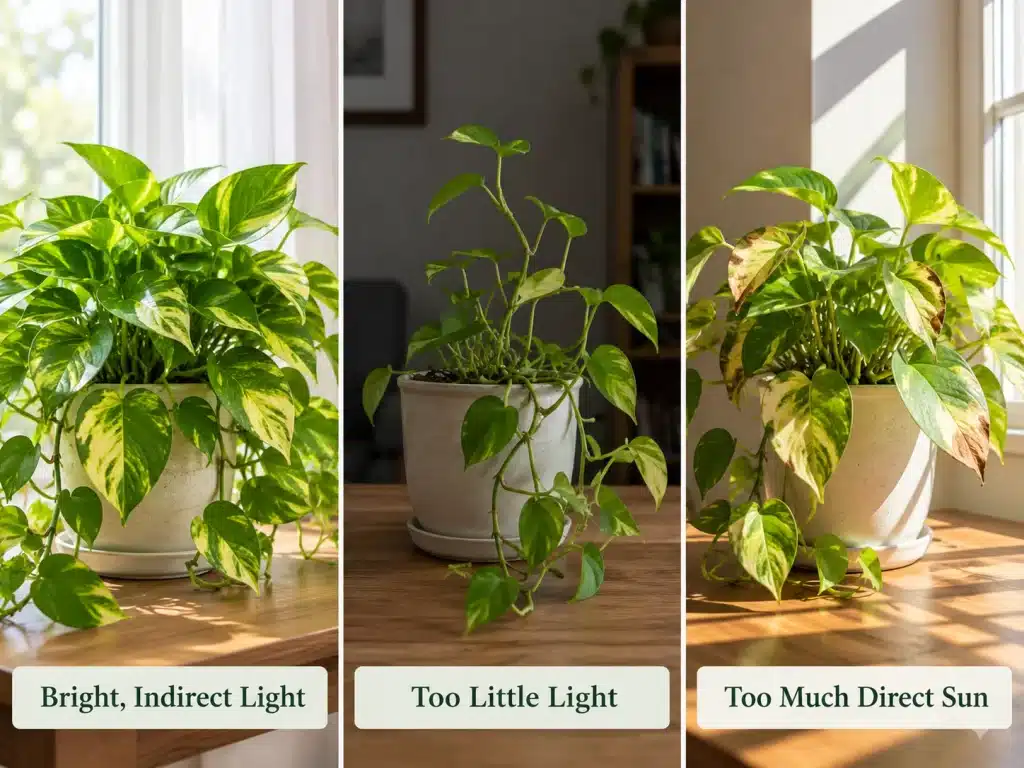
Pothos (Epipremnum aureum) grows best in bright, indirect light. It can survive in lower-light rooms, making it a popular houseplant for homes and offices, but insufficient light may reduce its growth and cause variegated leaves to lose some of their distinctive coloring. Prolonged direct sunlight can also damage the foliage.
According to NC State Extension’s pothos growing guide, pothos prefers bright, indirect light and can tolerate low-light conditions for extended periods. The goal is to find a location that provides enough light for healthy growth without exposing the leaves to intense, direct sun.
Best Indoor Lighting Conditions
Place your pothos near a bright window where the room receives plenty of natural light but the leaves are protected from prolonged direct sunlight. A sheer curtain can help diffuse strong sunlight, particularly when the sun shines directly through the window.
East- or north-facing windows may offer suitable locations in some homes, while a bright south- or west-facing window may require a little more distance or a curtain. The best position depends on the window, nearby buildings, outdoor shade, and the intensity of sunlight throughout the day.
Penn State Extension’s guide to growing pothos indoors recommends moderate to bright light and warns that direct sun can cause yellowing leaves.
A few practical adjustments can help you find the right spot:
- Look at the leaves: If they receive strong, direct sun for extended periods, move the plant farther from the window or filter the light.
- Consider the whole room: A room that looks bright to you may provide less light at the plant’s position, especially when the plant sits far from a window.
- Rotate the pot: Turning it periodically helps prevent the vines from growing predominantly toward one direction, as pothos stems naturally grow toward available light.
Can Pothos Grow in Low Light?
Yes. Pothos can tolerate low light, which is one reason it works well in many indoor spaces. However, tolerating low light does not mean that low light is ideal for vigorous growth.
In a dim location, your plant may grow less vigorously and lose some of the visual qualities that make its foliage attractive. If the vines become sparse or new leaves appear less colorful, consider whether the plant would benefit from a brighter position with indirect light.
Before moving it, assess the actual lighting conditions at the leaves rather than judging the room alone. A pothos on a shelf several feet from a window may receive substantially less light than one positioned close to the same window.
The NC State Extension plant profile specifically identifies low light as a possible cause of lost variegation. If your plant is surviving but producing disappointing growth, improving its light conditions may be more useful than immediately adding fertilizer.
How Light Affects Variegated Leaves
Variegated pothos varieties have leaves with multiple colors or patterns, such as the yellow markings of Golden Pothos and the cream or white patches of Marble Queen. These patterns differ among cultivars, and their light requirements can vary accordingly.
Low light may cause some variegated varieties to lose part of their distinctive coloring. Cultivars with extensive white or cream markings, such as Marble Queen, generally benefit from brighter indirect light to maintain their appearance.
However, more sunlight is not always better. Moving a pothos into harsh direct sun to improve its coloration can damage the leaves. Aim for consistent, bright, filtered light rather than maximum sun exposure.
The following comparison can help you assess your plant’s location:
Lighting condition | What to look for | Recommended adjustment |
|---|---|---|
Bright, indirect light | A well-lit position without prolonged direct sun on the foliage | Maintain the location if the plant is growing well |
Insufficient light | Reduced vigor or fading variegation | Move the plant closer to a suitable light source |
Excessive direct sunlight | Yellowing or visibly damaged leaves after intense sun exposure | Filter the sunlight or move the plant away from direct rays |
Remember that leaf color alone cannot establish the cause of a problem. If your pothos develops yellow leaves, consider its watering and root conditions as well as its light exposure before deciding what to change.
How Often Should You Water a Pothos Plant?
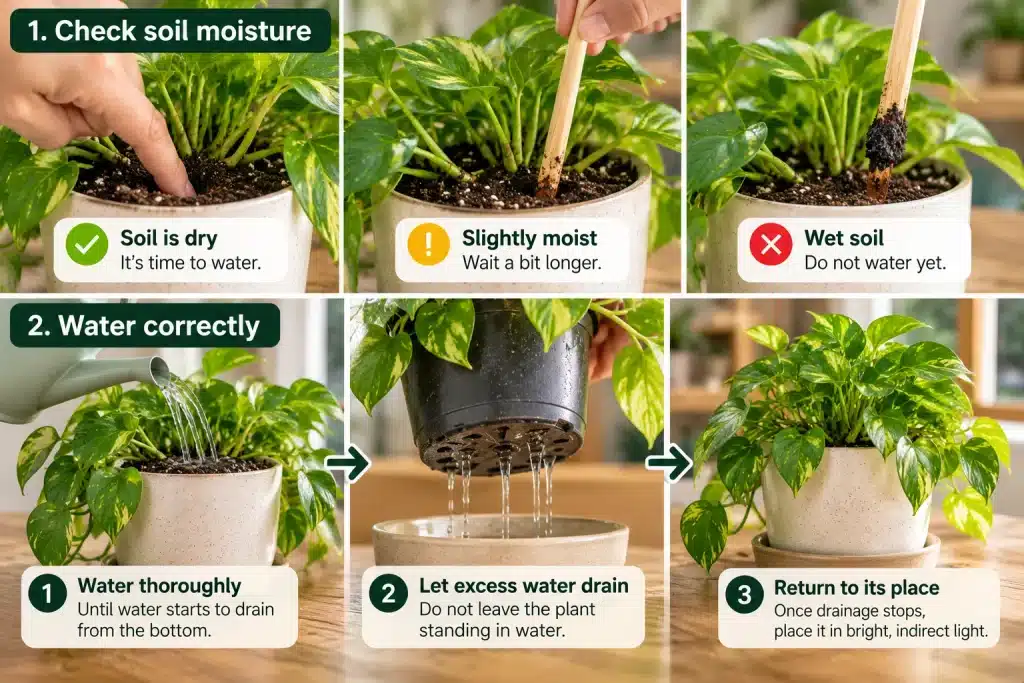
Water your pothos when the upper layer of potting mix has dried, rather than following a fixed weekly schedule. For many indoor plants, checking the soil about 1–2 inches below the surface provides a useful starting point. The exact interval depends on the plant’s growing conditions, including light, temperature, humidity, pot size, and drainage.
Wisconsin Horticulture recommends a well-aerated growing medium and watering pothos when the soil surface is dry. Penn State Extension’s Pothos as a Houseplant guide similarly advises watering when the soil is dry and warns that excessive moisture can cause root rot.
The goal is to give the roots access to moisture without leaving them in persistently wet soil.
How to Check Soil Moisture
The simplest way to decide whether your pothos needs water is to check the potting mix directly.
- Feel the soil. Insert your finger approximately 1–2 inches into the mix. If it still feels moist, wait before watering. If it has dried to that depth, your plant may be ready for water.
- Check below the surface when necessary. The top layer can dry before the deeper soil, particularly in a large pot. If the mix feels damp farther down, give it more time to dry.
- Consider the pot’s weight. A pot usually feels lighter as its growing medium loses moisture. Comparing its weight after watering with its weight as it dries can help you recognize when it needs water again.
- Look at the plant, but do not rely on its leaves alone. Drooping leaves can indicate underwatering, but they can also occur when roots are stressed by excessive moisture. Check the soil before deciding what your pothos needs.
Avoid waiting until the plant is severely wilted. Pothos can tolerate some drying between waterings, but prolonged dryness is unnecessary and can stress the plant. Illinois Extension’s houseplant watering guidance explains why checking the soil is more reliable than following a calendar.
How to Water Without Waterlogging the Roots
When the soil is ready, water your pothos thoroughly rather than giving it frequent, small splashes.
Follow these steps:
- Water the soil evenly. Pour water slowly over the surface so moisture can spread through the growing medium and reach the roots.
- Continue until excess water drains out. Water should flow freely through the drainage holes at the bottom of the pot. This helps moisten the root ball throughout, rather than wetting only the surface.
- Let the pot drain. Allow excess water to escape before returning the plant to its usual position.
- Empty the saucer or outer pot. Do not leave the bottom of the pot standing in collected water. Persistent moisture around the roots increases the risk of root rot.
These steps follow Illinois Extension’s recommended watering method, which advises thoroughly soaking the soil, allowing excess water to drain, and emptying the saucer afterward.
If your pothos sits inside a decorative pot without drainage holes, check for trapped water after watering. A removable nursery pot with drainage holes makes it easier to water the plant properly and discard excess moisture.
Adjusting Watering to Seasonal Conditions
Your pothos may need water more frequently during warm, bright periods and less frequently during cooler, darker months. This is because light levels, temperature, and growth rate affect how quickly the plant uses water and how rapidly its growing medium dries.
During spring and summer, check the soil regularly as your plant enters a period of more active growth. If it receives brighter indirect light or sits in a warmer room, the mix may dry faster.
During fall and winter, indoor pothos plants often grow more slowly because daylight decreases and temperatures may be lower. Water use can decline, so the soil may take longer to dry. Continue checking the mix rather than automatically reducing watering by a predetermined amount.
Illinois Extension’s guidance on overwintering houseplants explains how reduced winter light and growth can lower water demand. Your home’s actual conditions should determine how often you water.
Use this simple decision guide whenever you are unsure whether to water:
- Is the soil still moist 1–2 inches below the surface? Wait and check again later.
- Has the soil dried to that depth? Check that the pot has working drainage holes and is not already sitting in water.
- Is the soil dry and drainage working properly? Water slowly and thoroughly until excess water runs out of the bottom.
- Has water collected in the saucer or decorative pot? Empty it so the roots are not left standing in water.
- Is the soil staying wet for an unusually long time? Recheck the drainage and growing conditions before adding more water.
This moisture-based approach is more reliable than watering every Sunday or following any other universal schedule. With regular checks, you can learn how quickly your particular pothos dries out and adjust your routine as its growing conditions change.
What Soil and Pot Are Best for Pothos?
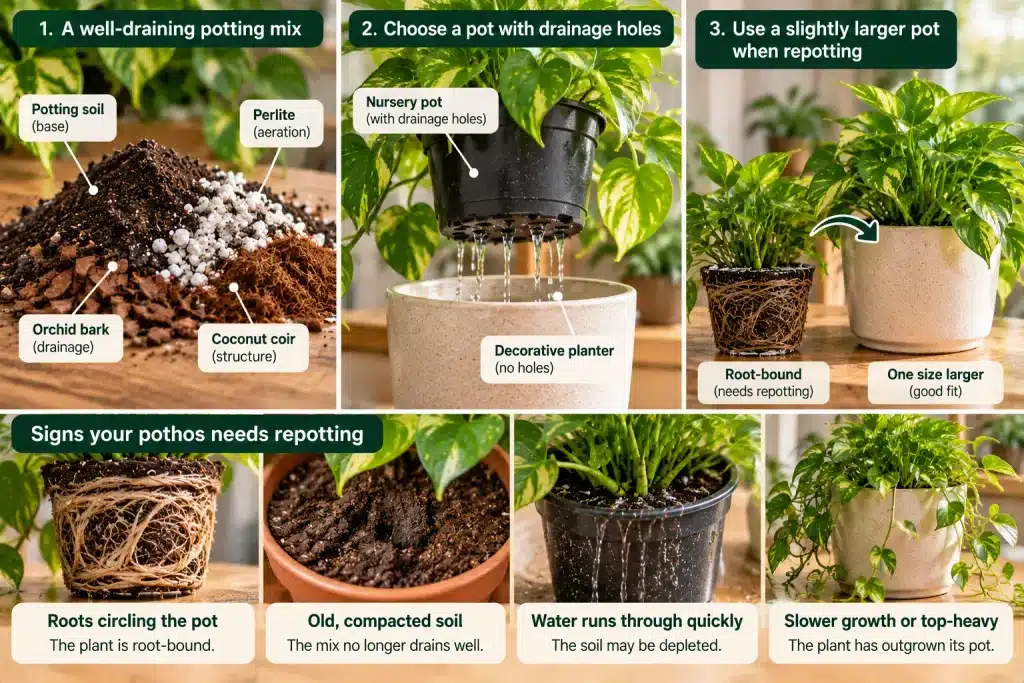
The best soil for pothos is a well-draining, airy potting mix that retains some moisture without staying soggy. Pair it with a container that has drainage holes so excess water can escape instead of collecting around the roots.
According to Wisconsin Horticulture’s pothos care guide, pothos grows best in a well-aerated growing medium. Good soil structure and an appropriate pot work together: the mix provides moisture and space for roots to grow, while the container allows excess water to drain away.
You do not need a complicated soil recipe or an expensive planter. A quality indoor potting mix and a properly sized pot with drainage are a practical starting point for healthy pothos growth.
Choosing a Well-Draining Potting Mix
Choose a general-purpose, soilless houseplant potting mix that feels loose rather than dense and compacted. A suitable mix should hold enough moisture for the roots to absorb water while maintaining air spaces that allow them to function properly.
Many commercial houseplant mixes contain organic materials that retain moisture alongside ingredients such as perlite, vermiculite, or bark. Perlite, in particular, helps maintain the pore spaces that allow oxygen to reach plant roots, as explained in Wisconsin Horticulture’s guide to healthy houseplant roots.
When choosing a potting mix for pothos, keep these points in mind:
- Look for good drainage. Water should be able to move through the mix rather than pooling on the surface or leaving the soil saturated for prolonged periods.
- Prioritize aeration. Roots need access to oxygen as well as moisture. A mix that becomes densely compacted can restrict airflow and create unfavorable conditions for root health.
- Avoid ordinary garden soil in indoor pots. Garden soil can compact inside containers, drain poorly, and introduce soilborne disease organisms. A commercial soilless potting mix is a more suitable choice for indoor pothos.
- Pay attention to how the mix behaves. If it becomes hard and compacted, remains wet for an unusually long time, or no longer absorbs water evenly, its condition may justify refreshing or replacing it.
Poor drainage and persistently wet soil can contribute to root rot. Pothos is relatively easy to maintain, but even a resilient plant can develop root problems when its growing medium does not provide suitable moisture and airflow.
Why Drainage Holes Matter
Drainage holes are one of the most useful features of a pothos pot. They allow excess water to escape, making it easier to water the root ball thoroughly without leaving the growing medium waterlogged.
A pot without drainage holes makes moisture management more difficult because excess water has nowhere to go. Even if the surface appears dry, water can accumulate near the bottom, leaving roots exposed to prolonged moisture.
When choosing a container, consider the following:
- Choose a pot with drainage holes. Check that the openings are not blocked and that water can escape freely.
- Select an appropriate size. When repotting, choose a container approximately one size larger than the current pot if the roots need more room. An unnecessarily large pot holds more growing medium than the plant can use efficiently, which can prolong drying and increase the risk of root problems.
- Use a saucer to protect surfaces. A saucer can collect runoff, but empty it after watering so the pot does not remain in standing water.
You can still use a decorative planter that has no drainage holes. The simplest solution is to keep your pothos in its original nursery pot, or another suitable plastic pot with drainage holes, and place that pot inside the decorative planter.
This double-potting method provides the appearance of a decorative container without requiring you to plant directly into it.
To use this arrangement properly:
- Keep the pothos planted in the inner pot with drainage holes.
- Remove the inner pot when watering, if practical, and water the plant where excess water can drain safely.
- Let the water finish draining before returning the inner pot to the decorative planter.
- If you water the plant while it is inside the decorative planter, check the bottom afterward and empty any collected water.
As Wisconsin Horticulture’s guidance on healthy houseplant roots explains, a liner pot inside a decorative container can provide an effective solution, provided the inner pot does not sit in accumulated water.
Signs Your Pothos Needs Repotting
Pothos does not need a larger pot simply because time has passed. Repotting is more useful when the roots have outgrown their available space or the growing medium has deteriorated.
Look for these signs:
- Roots growing through drainage holes. Visible roots emerging from the bottom or appearing on the soil surface can indicate that the plant is running out of room.
- Roots tightly circling the root ball. If you gently slide the plant out of its pot and find a dense mass of roots circling the outside, with relatively little loose soil remaining, repotting is likely appropriate.
- Potting mix drying unusually quickly. If the soil dries much faster than it used to, even under similar growing conditions, a root-filled pot may be holding too little growing medium relative to the plant’s needs.
- Slowed growth during the active growing season. If your pothos is growing poorly despite otherwise suitable light, watering, and care, check whether its roots are crowded before assuming the pot is the problem.
- Deteriorated growing medium. Soil that has become compacted or no longer drains properly may need replacing, even if the plant does not require a substantially larger container.
These indicators are consistent with Wisconsin Horticulture’s houseplant repotting guidance, which recommends checking the root ball rather than relying on a single symptom.
Yellow leaves alone do not necessarily mean your pothos needs repotting. Excess moisture, inadequate watering, and other growing conditions can also cause leaf discoloration. Check the roots and soil condition before deciding what to change.
When repotting is necessary, spring is generally a good time because many houseplants begin growing more actively. Choose a pot only one size larger than the existing container, use fresh, well-draining potting mix, and make sure the new pot has drainage holes.
If the plant is still comfortable in its current container but the soil has deteriorated, refreshing the growing medium may be more appropriate than moving it into a much larger pot.
The goal is straightforward: give your pothos enough room for healthy root growth, maintain good airflow around the roots, and make excess water easy to remove.
Why Are My Pothos Leaves Turning Yellow?
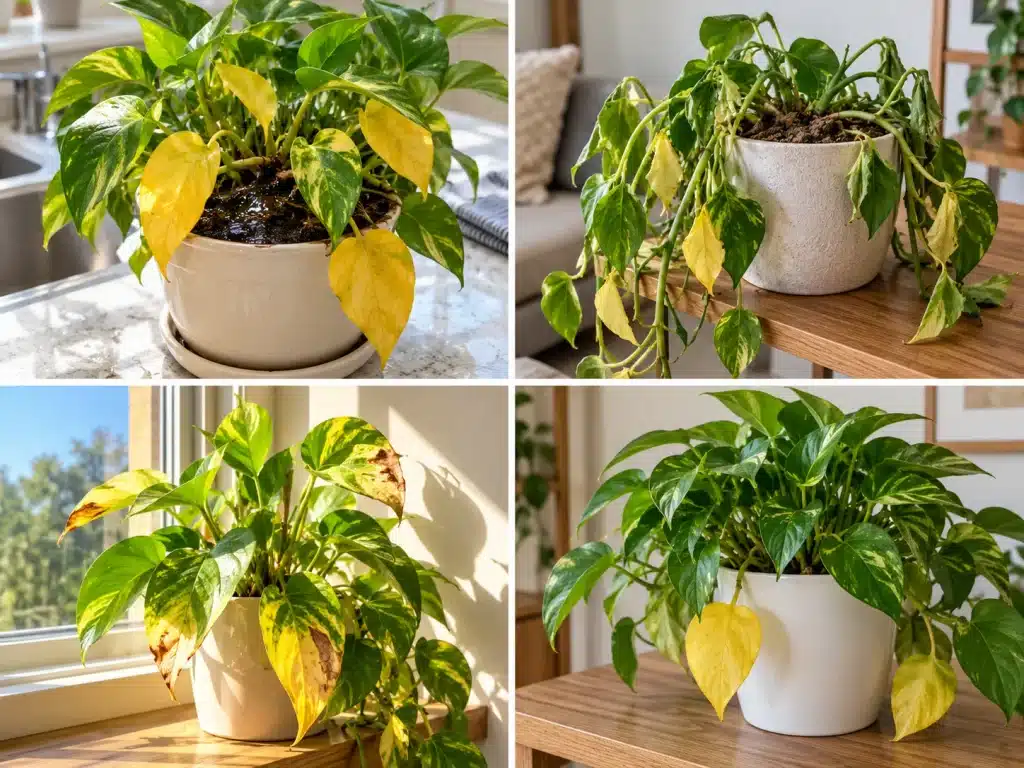
Yellow leaves on a pothos plant can indicate overwatering, underwatering, excessive sunlight, natural aging, or another problem with its growing conditions. The best way to identify the cause is to examine the soil, the affected leaves, and the plant’s recent environment before changing your care routine.
According to Wisconsin Horticulture’s pothos care guide, older pothos leaves naturally turn yellow and drop, while excessive watering can contribute to root rot and leaf discoloration. Penn State Extension’s pothos guide also identifies excessive direct sunlight as a cause of yellowing.
A few yellow leaves do not necessarily mean your pothos is unhealthy. Gradual yellowing of an occasional older leaf is usually less concerning than widespread yellowing, persistent wilting, or damage affecting newly emerging leaves. Those patterns deserve a closer look.
Overwatering and Root Rot
Overwatering is one of the first things to investigate when pothos leaves turn yellow, especially if the potting mix stays wet for extended periods.
When growing medium remains excessively wet, the roots can become damaged and lose their ability to absorb water and nutrients effectively. Root rot may develop, leading to yellowing, wilting, leaf drop, and declining growth. Wisconsin Horticulture identifies overwatering as a common cause of root rot in pothos.
Look for these warning signs:
- Several leaves turning yellow over a short period.
- Potting mix that remains wet long after watering.
- Leaves that droop even though the soil is moist.
- Brown, soft, or deteriorating roots when the root ball is inspected.
If the soil is persistently wet and your plant continues to deteriorate, check the drainage holes and inspect the roots. Healthy roots are generally firm and white to tan, while rotting roots may be brown, soft, or mushy. NC State Extension’s container plant guide explains how root condition can help distinguish watering problems from root damage.
How to fix it: Allow the growing medium to dry appropriately between waterings, make sure excess water can escape, and empty any water collected in the saucer or decorative planter. If root rot is evident, remove the plant from its pot and assess the damage rather than simply waiting for the soil to dry. If you remove rotting roots, use clean, sharp scissors or shears and remove only roots that are soft or mushy; avoid cutting healthy roots unnecessarily. Use a clean pot and fresh, well-draining potting mix. Recovery depends on the extent of the damage, so repotting should not be treated as a guaranteed cure.
Avoid adding fertilizer to a plant with suspected root damage. Address the root and moisture problem first.
Underwatering and Prolonged Soil Dryness
Underwatering can also stress pothos, particularly when the potting mix becomes very dry for an extended period.
A thirsty pothos may develop drooping leaves, dry or brown leaf edges, and a generally limp appearance. NC State Extension’s plant diagnostics guidance identifies wilting and marginal leaf burn among the possible effects of underwatering.
Check the soil before assuming that drooping means the plant needs water. An underwatered pothos typically has very dry growing medium, whereas an overwatered plant may droop while the soil remains wet.
How to fix it: If the mix is dry and the pot drains properly, water thoroughly until excess water flows from the drainage holes. Allow the pot to drain, then monitor the plant as it recovers. If the potting mix has become so dry that water runs straight through without moistening the root ball, water slowly in stages to help the mix absorb moisture more evenly.
Do not respond to every yellow leaf by watering more frequently. Once the soil has been rehydrated, return to checking its moisture before watering again. A plant that remains wilted despite moist soil may have damaged roots or another underlying problem.
Light Stress and Direct Sunlight
Pothos grows best in bright, indirect light, although it can tolerate lower-light conditions. Both excessive sunlight and insufficient light can affect its appearance, but they tend to produce different patterns.
Too much direct sunlight can cause yellowing, bleached patches, or dry, brown areas where the leaves have been scorched. The damage is particularly suspicious when it appears after you move the plant closer to a sunny window or expose it to stronger sunlight.
Too little light is more likely to cause slow growth, pale foliage, and long, stretched-out stems as the plant grows toward the available light. Some variegated pothos varieties may also lose the contrast in their leaf patterns under inadequate lighting.
These effects are consistent with NC State Extension’s guidance on light requirements for container-grown plants and Wisconsin Horticulture’s pothos care recommendations.
How to fix it: Move a sun-damaged pothos to a position with bright, indirect light, away from intense direct sun. If the plant is growing in a very dim corner, gradually move it closer to a suitable light source. Avoid making several drastic changes to its environment at once, and monitor new growth to see whether conditions improve.
Existing yellow or scorched areas will not necessarily turn green again. Judge recovery by the condition of the remaining foliage and the health of new leaves.
Natural Aging of Older Leaves
Sometimes, yellow leaves are simply part of your pothos’s normal growth cycle.
As the plant matures, older leaves eventually yellow and fall away. This is especially likely when only one or two older leaves are affected gradually while the rest of the plant looks healthy.
Wisconsin Horticulture’s pothos guide specifically identifies the natural yellowing and shedding of older leaves as part of pothos growth.
To distinguish normal aging from a care problem, consider the pattern:
- One or two older leaves yellowing gradually: Usually not a cause for concern if the rest of the plant remains healthy.
- Several leaves yellowing at the same time: Check soil moisture, drainage, and recent changes in light or temperature.
- New leaves turning yellow or developing damage: Investigate further rather than assuming natural aging.
- Yellowing accompanied by persistent wilting or stunted growth: Check the roots and inspect for other signs of stress.
You can remove fully yellow or dead leaves with clean scissors. However, there is no need to repot, fertilize, or otherwise treat your pothos solely because an occasional older leaf has reached the end of its life.
Nutrient Problems, Pests, and Other Possible Causes
If watering and lighting appear appropriate, consider whether nutrient problems, pests, disease, or environmental changes could explain the yellowing.
Nutrient deficiencies and excess fertilizer
A depleted growing medium can eventually limit nutrient availability, especially when a plant has been growing for a long time without appropriate feeding or fresh potting mix. However, yellow leaves alone cannot tell you which nutrient, if any, is missing.
Excess fertilizer can also cause problems. Salt buildup may damage roots and contribute to brown leaf margins or tips, sometimes accompanied by discoloration. Wisconsin Horticulture identifies excess fertilizer, inadequate watering, and overwatering as possible causes of leaf-margin or tip damage.
Before applying fertilizer, review your recent feeding history and check the soil moisture and roots. If the plant is otherwise healthy but has a plausible nutrient deficiency, use a balanced houseplant fertilizer according to its label rather than increasing the dose indiscriminately.
Pests
Mealybugs, scale insects, and spider mites can affect pothos. Depending on the pest and the severity of the infestation, you may notice yellowing, speckled leaves, sticky residue, fine webbing, or visible insects.
Inspect both sides of the leaves, the joints where leaves meet stems, and the stems themselves. Mealybugs may look like small white cottony masses, while scale insects can resemble small brown bumps attached to stems or leaves.
University of Minnesota Extension’s guide to managing insects on indoor plants recommends examining leaf undersides for insects and webbing, isolating plants with pests, and identifying the problem before choosing a treatment.
If you find pests, separate the affected plant from nearby houseplants while you assess the infestation. Start with an appropriate physical cleaning or removal method when practical. Use a pesticide only when necessary and choose one labeled for the identified pest and intended indoor use.
Disease and environmental stress
Leaf spots, unusual patterns of discoloration, and declining growth can also indicate disease or environmental stress. Sudden temperature changes, cold drafts, or abrupt changes in growing conditions may contribute to leaf damage.
Because several unrelated problems can produce similar symptoms, yellowing by itself does not confirm a fungal infection, bacterial disease, or nutrient deficiency. NC State Extension’s plant diagnostics guide recommends examining the growing conditions alongside visible signs of pests and pathogens before deciding on a cause.
How to Diagnose and Fix Yellow Pothos Leaves
When your pothos develops yellow leaves, work through the following checks in order. This helps you address the most likely causes before applying fertilizer, pesticides, or unnecessary treatments.
Step 1: Identify which leaves are affected.
Start by looking at the overall pattern. Are one or two older leaves yellowing gradually, or are several leaves turning yellow at once? Is the damage concentrated on the side facing a window, or are younger leaves affected too?
Gradual yellowing of an occasional older leaf may be normal. Widespread yellowing, repeated leaf loss, or damage to new growth warrants further investigation.
Step 2: Check the soil moisture.
Feel the potting mix below the surface rather than judging it by appearance alone.
- If the soil is very dry and the plant is drooping, underwatering may be responsible.
- If the soil is persistently wet, investigate overwatering and poor drainage.
- If the soil moisture seems appropriate, continue to the next checks rather than changing your watering routine immediately.
Step 3: Check the pot and roots if necessary.
Make sure the drainage holes are clear, and the pot is not sitting in collected water. If the mix remains wet for an unusually long time and the plant is deteriorating, gently remove the root ball for inspection.
Firm, healthy-looking roots are reassuring. Brown, mushy, or deteriorating roots suggest root damage and may require intervention.
Step 4: Review the plant’s light and environment.
Think about recent changes. Has the pothos been moved into direct sunlight? Has it been placed in a darker room? Has it experienced a cold draft or a sudden temperature change?
Correct any obvious environmental problem, then monitor the plant’s response. Avoid moving it repeatedly between locations.
Step 5: Inspect for pests and review fertilizer use.
Examine the leaf undersides, stems, and leaf joints for insects, webbing, sticky residue, or unusual spots. Also consider whether the plant has received excessive fertilizer or has been growing in the same depleted potting mix for a long time.
Treat a confirmed pest problem appropriately. Consider fertilizer only when the evidence supports a nutritional issue and other likely causes have been addressed.
Step 6: Make one targeted change and monitor new growth.
Once you have a reasonable explanation, correct that specific problem. Improve drainage if the soil stays wet, adjust watering if the mix becomes too dry, or move the plant away from intense direct sunlight if its leaves show signs of scorching.
Keep track of whether additional leaves turn yellow and whether new growth appears healthy. Existing damage may remain visible even after conditions improve, so the absence of new symptoms is often more useful than expecting yellow leaves to regain their color.
Use the following table as a quick reference when troubleshooting:
Observable sign | What to investigate | Next step |
|---|---|---|
Yellow leaves with persistently wet soil | Excess moisture and possible root damage | Check drainage and inspect roots if deterioration continues |
Drooping with very dry soil | Underwatering | Water thoroughly and reassess the plant |
Scorched or yellowing leaves after intense sun exposure | Excessive direct light | Move to bright, indirect light |
One or two older leaves yellowing gradually | Natural aging | Monitor the plant for additional symptoms |
Yellowing with spots or visible insects | Pests, disease, or environmental damage | Inspect leaf undersides and identify the cause before treatment |
The key to effective pothos care is diagnosing the pattern rather than treating the color alone. Check moisture, light, root health, and visible pests first to choose an appropriate response and avoid making the problem worse with unnecessary watering, fertilizer, or pesticides.
What Temperature and Humidity Does Pothos Need?
Pothos grows best in warm indoor conditions with moderate to high humidity, but it can adapt to the temperature and humidity levels found in many homes. Aim for comfortable, relatively stable room temperatures, keep the plant away from cold drafts and direct blasts of hot or cold air, and increase humidity only if your growing conditions call for it.
According to Clemson Cooperative Extension’s pothos care guide, pothos prefers daytime temperatures of 70–85°F and nighttime temperatures of 60–70°F. Clemson also identifies 50–70% relative humidity as a preferred range, although pothos can tolerate the lower humidity levels common in many homes.
These ranges describe favorable growing conditions, not rigid limits that every indoor plant must meet. A healthy pothos can grow successfully in an ordinary living room without a dedicated humidifier or daily misting.
Suitable Indoor Temperatures
Pothos is a tropical plant that favors warmth. For vigorous growth, aim for daytime temperatures around 70–85°F (21–29°C), with nighttime temperatures around 60–70°F (16–21°C). These ranges follow Clemson Extension’s recommendations for growing pothos indoors.
Wisconsin Horticulture gives a broader favorable range of 70–90°F and notes that pothos can survive a wide variety of environmental conditions. Together, these recommendations show why maintaining a warm, comfortable room is generally more useful than trying to hold your home at one exact temperature.
To keep your pothos comfortable:
- Maintain reasonably stable temperatures. Normal household temperature fluctuations are generally manageable, but avoid exposing the plant to sudden, substantial changes.
- Watch for cold conditions. Pothos may develop leaf damage when temperatures become too low, particularly if the plant is also exposed to drafts.
- Avoid excessive heat. Hot air from a heating vent can dry the foliage and stress the plant, especially when the air is very dry.
- Adjust placement seasonally. A windowsill that provides suitable conditions in summer may become too cold during winter nights.
If your home stays within a comfortable indoor temperature range, you usually do not need a heating mat or special temperature-control equipment for an established pothos.
Does Pothos Need Extra Humidity?
Pothos appreciates humidity, but extra humidity is not essential for every indoor plant. Clemson Extension identifies 50–70% relative humidity as the preferred range for pothos while noting that it tolerates the approximately 30–60% range commonly found in homes.
If your plant is growing well and its leaves remain healthy, there is generally no need to buy a humidifier or mist the foliage as part of a strict daily routine.
Extra humidity may be helpful when indoor air is consistently very dry, particularly during winter when heating systems can lower relative humidity. Possible signs of stress include dry leaf edges or brown tips, although these symptoms can also result from watering problems, excess fertilizer, or intense light. Check the plant’s overall growing conditions before assuming humidity is the cause.
If you decide to increase humidity, consider these options:
- Use a room humidifier. This is a practical option when the indoor air remains dry for extended periods. A small humidity meter can help you determine whether additional moisture is needed.
- Group nearby houseplants. Plants grouped can create a slightly more humid local environment, although the effect depends on room conditions.
- Choose a naturally more humid room. A bright bathroom may suit pothos if it receives enough indirect light and does not experience extreme temperature changes.
You do not need to achieve a particular humidity percentage at all times. Use the preferred range as a guide, and let the plant’s condition and your home’s actual environment determine whether additional humidity would be beneficial.
Avoiding Cold Drafts and Sudden Temperature Changes
Where you place your pothos matters just as much as the temperature shown on your thermostat. A room may feel comfortable overall while a nearby window, air-conditioning vent, or heating register exposes the plant to an unfavorable stream of air.
Wisconsin Horticulture’s pothos care recommendations advise keeping pothos away from drafts. The same guide notes that low temperatures or abrupt temperature changes can cause scattered brown patches on leaves. Clemson Extension also recommends avoiding air-conditioning vents during summer and cold windowsills or heating vents during winter.
Choose a location away from:
- Drafty windows and exterior doors, especially during cold weather.
- Air-conditioning vents that blow cold air directly onto the foliage.
- Heating registers and radiators that expose the plant to hot, dry air.
- Sudden temperature changes, such as moving a plant directly from a warm room into a much colder environment.
If your pothos develops scattered brown patches after a cold night or a sudden environmental change, review its recent exposure before changing your watering or fertilizing routine. Temperature-related damage can overlap with other causes of leaf discoloration, so consider the timing and pattern of the symptoms rather than relying on appearance alone.
For most homes, the simplest approach is to keep pothos in a warm room with stable conditions, provide suitable indirect light, and avoid direct exposure to heating or cooling equipment. This gives the plant the conditions it prefers without adding unnecessary maintenance.
When and How Should You Fertilize Pothos?
Fertilize pothos moderately during active growth, usually from spring through early fall, using a general-purpose houseplant fertilizer according to its label. For a typical indoor pothos, feeding approximately every other month is a practical starting point. Reduce or pause fertilizing during winter when growth slows, and avoid adding fertilizer simply because the plant has yellow leaves or looks unhealthy.
Wisconsin Horticulture’s pothos care guide recommends fertilizing every other month except during winter, when the plant is not actively growing. NC State Extension’s pothos profile gives similar advice.
The right schedule depends on the fertilizer formulation, the growing medium, and how actively your plant is growing. More fertilizer does not automatically produce fuller vines or larger leaves. The goal is to supply nutrients without allowing excess fertilizer salts to accumulate around the roots.
Fertilizing During Active Growth
Pothos generally benefits from supplemental nutrients while producing new leaves and extending its vines. Because a potted plant has a limited amount of growing medium, its available nutrient supply can gradually decline.
For most indoor pothos plants, a complete, general-purpose houseplant fertilizer is sufficient. You do not need a specialized product marketed specifically for pothos. Wisconsin Horticulture’s houseplant care recommendations explain that complete houseplant fertilizers can provide the nutrients many indoor plants need.
Follow these practical guidelines when feeding your plant:
- Choose an appropriate fertilizer. A general-purpose fertilizer labeled for indoor foliage plants is a reasonable choice. Check its nutrient information and application instructions before use.
- Follow the product label. Dilute concentrated liquid fertilizers as directed, and never exceed the recommended concentration or application frequency. Different products can have different formulations, so do not assume that the same dose works for every fertilizer.
- Feed when the plant is growing actively. Spring and summer are typical feeding periods for indoor pothos, provided the plant has suitable light, water, and temperature conditions.
- Avoid fertilizing dry potting mix. If the growing medium is dry, water the plant first rather than applying concentrated fertilizer to dry roots. NC State Extension’s guide to fertilizing houseplants advises against fertilizing dry potting mix.
- Allow time between applications. Do not add extra fertilizer simply because growth seems slower than expected. First check whether light, watering, root health, or other conditions may be limiting growth.
A simple routine is to check your plant’s growth and fertilizer history every month or two, then feed according to the product instructions and the plant’s needs. The every-other-month schedule recommended specifically for pothos is a useful starting point, not a requirement to fertilize on an exact date.
Recognizing Excessive Fertilizer
Too much fertilizer can damage pothos roots and foliage rather than improve growth. Fertilizers contain soluble mineral salts, and excessive applications can cause these salts to accumulate in the growing medium.
According to Wisconsin Horticulture’s pothos care guide, excess fertilizer can contribute to blackened leaf margins or tips, sometimes accompanied by yellowing. Other possible warning signs include brown, scorched leaf edges, wilting, and declining growth.
Look for clues such as:
- Brown or blackened leaf tips and margins: Check whether the damage began after a recent fertilizer application or repeated feeding.
- A crusty deposit on the soil surface or pot rim: This may indicate accumulated mineral salts, although deposits can also come from minerals in irrigation water.
- Wilting despite moist soil: Excess salts can interfere with the roots’ ability to take up water, so adding more water or fertilizer without checking the cause may worsen the problem.
- Leaf damage following frequent or concentrated feeding: Review the product’s recommended dose and your recent application history.
These signs do not prove that fertilizer is responsible. Overwatering, underwatering, root damage, and other environmental problems can produce similar symptoms.
If you suspect overfertilization, stop feeding temporarily. Check the drainage holes and examine the growing medium for signs of salt buildup. If the pot drains freely and the roots are not severely damaged, thoroughly watering the medium with plain water and allowing excess water to drain can help leach out soluble fertilizer salts. NC State Extension describes this approach in its houseplant fertilizing guidance.
If the soil is already persistently waterlogged or root rot is suspected, do not repeatedly flush the pot without addressing the drainage and root problems. Correct the underlying issue first.
Wait until the plant is recovering and producing healthy growth before resuming fertilization. When you do, follow the label rather than compensating for earlier problems with another heavy application.
Adjusting Feeding When Growth Slows
Pothos often grows more slowly during fall and winter as daylight decreases. A plant in a dim room may also produce little new growth throughout the year, even when its watering routine is appropriate.
When growth slows, reduce or pause fertilization rather than continuing to feed automatically. Wisconsin Horticulture’s houseplant care guidance recommends fertilizing during active growth and generally waiting until spring to resume feeding when growth has slowed over winter.
Use the plant’s condition to guide your decision:
- Healthy plant with little winter growth: Pause or reduce feeding while growth remains slow. Resume the usual routine when active growth returns.
- New leaves and extending vines during spring or summer: Continue moderate feeding according to the fertilizer label.
- Slow growth in a consistently dim location: Review light conditions before increasing fertilizer. Nutrients cannot compensate for insufficient light.
- Slow growth with wet soil, drooping, or yellowing leaves: Investigate watering and root health before applying fertilizer.
- Recently purchased pothos: Check whether the potting mix already contains fertilizer. Some commercially grown plants have enough nutrients in their original growing medium to delay the need for additional feeding.
Yellow leaves alone are not reliable evidence of nutrient deficiency. Wisconsin Horticulture’s explanation of yellow leaves describes several possible causes, including natural leaf aging, nutrient problems, and damaged roots in waterlogged soil.
Before adding fertilizer to a struggling pothos, check the soil moisture, drainage, lighting, and roots. If the plant has a plausible nutritional problem but its other growing conditions appear suitable, moderate feeding may help. If its roots are damaged or the soil remains too wet, fertilizer is unlikely to solve the underlying issue and may add further stress.
The best fertilizing routine is one that responds to active growth rather than the calendar alone. Feed moderately when your pothos can use the nutrients, reduce feeding when growth slows, and investigate other causes before treating yellow leaves as a deficiency.
How to Prune Pothos for Fuller Growth
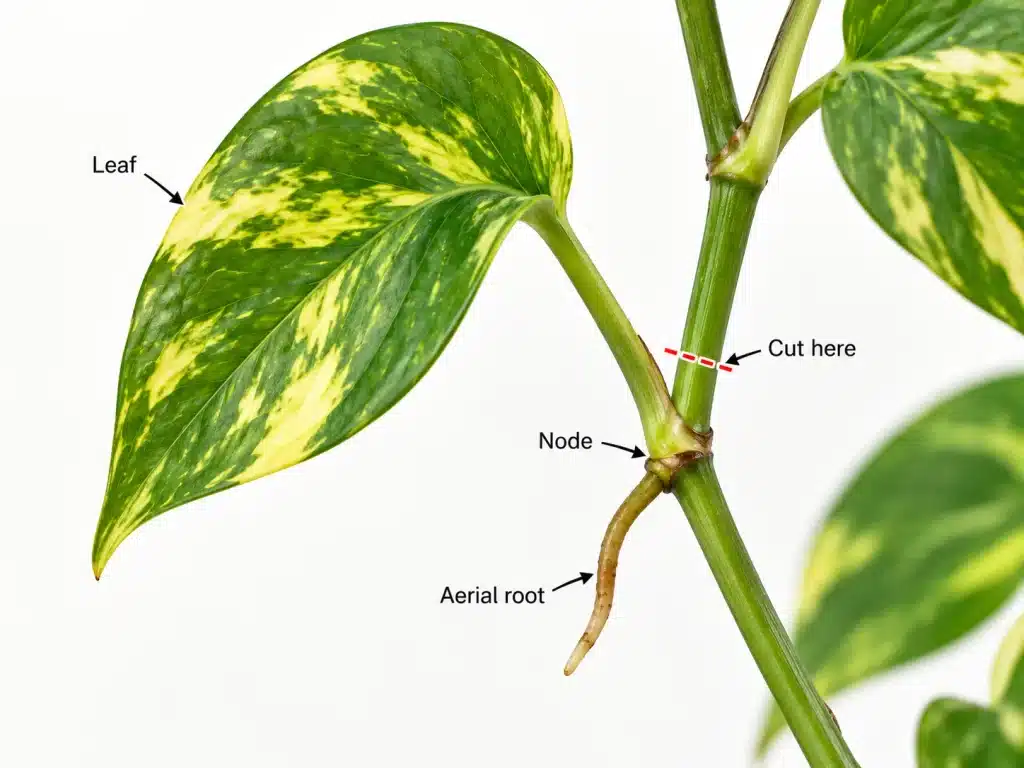
Pruning pothos is a simple way to control long vines, remove damaged growth, and encourage a fuller-looking plant. The key is to make cuts in the right places while providing enough light and maintaining healthy roots so the plant can produce new growth.
According to NC State Extension’s pothos care guide, pruning stems helps maintain a bushier growth habit. The Royal Horticultural Society’s epipremnum growing guide also recommends shortening overgrown stems to encourage denser growth and new side shoots.
Pruning can improve the plant’s shape, but it cannot compensate for poor growing conditions. If your pothos has long, sparse vines with widely spaced leaves, check its light exposure and root health before assuming that cutting it back will solve the problem.
Where to Cut a Pothos Vine
The best place to cut a pothos vine depends on whether you want to shorten the existing plant or prepare a cutting for propagation. In both cases, the node is the key landmark.
A node is the point along a stem where a leaf attaches and where an aerial root or new shoot may develop. These small junctions are easy to overlook on a long vine, but identifying them helps you make useful pruning cuts.
To prune an established pothos:
- Choose the vine you want to shorten. Look for stems that have become excessively long, sparse, damaged, or uneven compared with the rest of the plant.
- Find a suitable node. Follow the stem to a leaf joint where you want the remaining vine to end.
- Cut just above that node. Use clean, sharp scissors or pruning shears, leaving the selected node attached to the parent plant. A new shoot may develop from a bud at or near a node below the cut.
- Repeat selectively. Shorten additional vines as needed to create a balanced shape, rather than cutting every stem to the same length without considering the plant’s structure.
Wear gloves when handling or pruning pothos, as its sap can irritate skin. Wash your hands after handling cut stems.
The Royal Horticultural Society’s pruning guidance recommends cutting overlong stems back just above a leaf joint. Its propagation instructions also explain that detached stem cuttings should be trimmed just below a leaf joint so the cutting retains the node needed for rooting.
This distinction matters: when pruning the parent plant, cut above the node you want to keep; when preparing a cutting for propagation, include a node and make the lower cut beneath it.
You do not need to prune every vine. If your pothos already has an attractive shape and healthy growth, trimming is optional.
How to Manage Long or Sparse Vines
Long pothos vines are a natural part of the plant’s growth habit. You can allow them to cascade from a shelf or hanging basket, train them upward, or shorten them when they become too long or lose their shape.
If your plant has a few long stems with most of the foliage concentrated near the ends, use a combination of selective pruning and improved growing conditions.
For long, healthy vines: Shorten the stems to your preferred length, making cuts just above suitable nodes. This can encourage branching and help the plant develop a more compact appearance over time.
For sparse vines: Check whether the plant receives enough bright, indirect light. Insufficient light can contribute to weak growth and reduced foliage quality. Pruning may improve the shape, but the plant still needs suitable light to support healthy new leaves.
For damaged or leafless sections: Remove dead or damaged growth as appropriate. If a vine has healthy sections with leaves and nodes, you may be able to use those sections for propagation instead of discarding them.
You can also use healthy cuttings to make the original pot look fuller. Prepare several stem cuttings, making sure each has at least one node, and root them in water or a suitable growing medium. Once the cuttings have developed roots, they can be planted back into the original container if there is enough room.
This technique can help fill empty spaces around the pot, although results depend on the number of viable cuttings, their rooting success, and the plant’s growing conditions. The NC State Extension pothos profile confirms that pothos vines root readily in water.
Avoid removing too much healthy foliage at once, particularly if the plant is already weak or recovering from root problems. Leaves provide the energy needed to support continued growth, so selective pruning is a sensible approach when you want to reshape an established plant.
Trailing Versus Climbing Pothos
Pothos can grow beautifully as either a trailing houseplant or a climbing vine. Neither method is inherently better; the choice depends on the appearance you want and the space available.
Trailing pothos
Trailing pothos works well in hanging baskets, on shelves, and on plant stands where the vines can cascade naturally. Prune stems when they become too long, uneven, or sparse, or leave them untrimmed if you prefer a cascading appearance.
Climbing pothos
Climbing pothos can be trained onto a moss pole, coir pole, or suitable trellis. Its aerial roots help the vine attach to surfaces, and the support encourages upward growth. Keep the stems gently guided toward the support, using soft plant ties when necessary rather than forcing or tightly binding them.
According to the Royal Horticultural Society’s growing guide, epipremnums can be trained up moss- or coir-covered poles, wires, and trellises. Keeping a moss or coir support damp can help aerial roots attach to it.
NC State Extension also notes that pothos can develop larger, mature leaves when given adequate light and a suitable climbing support. However, indoor plants do not necessarily develop large mature foliage simply because they are attached to a pole; light and other growing conditions also matter.
If you want a fuller trailing plant, selective pruning and replanting rooted cuttings can help create a denser arrangement. If you prefer a vertical display, allow selected vines to climb and prune only the stems that interfere with the desired shape.
Whichever method you choose, focus on maintaining healthy foliage and roots. Pruning is most effective as part of good pothos plant care, not as a substitute for it.
How to Propagate Pothos
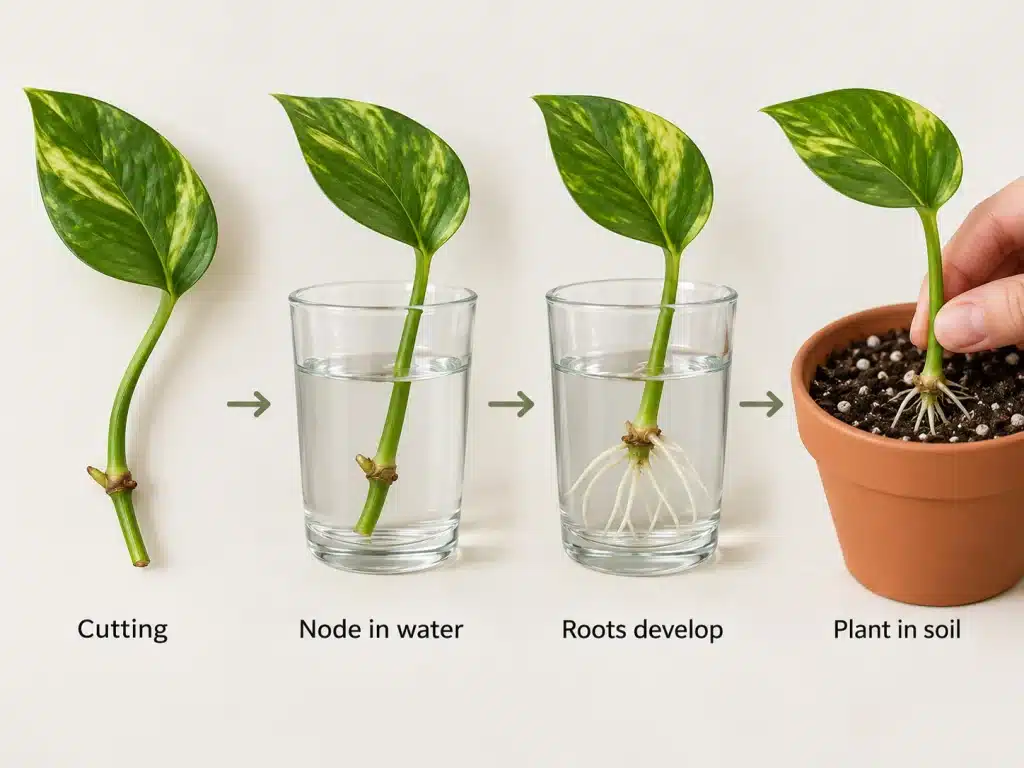
Propagating pothos is straightforward: take a healthy stem cutting that includes at least one node, then encourage it to develop roots in water or a suitable rooting medium. Once the cutting has established roots, you can grow it in a pot of well-draining soil and eventually add it to your existing plant collection.
According to Wisconsin Horticulture’s pothos care guide, pothos propagates readily from cuttings, with stems capable of rooting in water or vermiculite. The key is choosing a viable section of stem with a node, providing suitable conditions, and allowing the roots to develop at their own pace.
How to Take a Stem Cutting With a Node
A successful pothos cutting needs a node, the point on the stem where a leaf attaches and where roots or new growth can develop. A detached leaf without a section of stem containing a node will not produce a new pothos vine.
Follow these steps to prepare a cutting:
- Choose a healthy vine. Select a stem with healthy leaves and no obvious signs of rot, pest damage, or disease. A growing tip or a healthy section farther down the vine can work.
- Identify the nodes. Look for the joints along the stem, often recognizable by a leaf attachment or a small brown aerial root.
- Make the cut below a node. Using clean, sharp scissors or pruning shears, cut a section of stem that includes at least one node. A cutting around 3–6 inches long with multiple nodes is a practical choice.
- Remove the lowest leaves if needed. If you plan to root the cutting in water, remove leaves that would sit below the waterline. Keep the remaining leaves attached to the cutting.
- Keep track of the stem’s orientation. When preparing stem sections rather than tip cuttings, remember which end is the bottom so you can position the cutting correctly.
The University of Vermont Extension’s guide to propagating houseplants recommends taking a healthy stem cutting with several leaf nodes. Including more than one node gives you flexibility when positioning the cutting and helps ensure that a viable node remains available for rooting.
Rooting Cuttings in Water
Water propagation is a convenient option because you can watch the roots develop. Pothos is particularly well suited to this method, and you do not need rooting hormone to get started.
To root a pothos cutting in water:
- Choose a clean container. A clear glass or jar makes it easy to monitor the water level and root development.
- Add room-temperature water. Position the cutting so at least one node is submerged while the leaves remain above the surface.
- Place it in bright, indirect light. Avoid intense direct sunlight, which can heat the water and damage the foliage.
- Maintain clean water. Top up the container when the water level drops. Replace the water if it becomes cloudy, and clean the container if residue develops.
- Check for root development. Look for small roots emerging from the submerged node. Continue providing suitable light and water while they develop.
These steps follow University of Vermont Extension’s water-propagation guidance, which specifically identifies pothos as a houseplant that roots readily in water.
How long does pothos propagation take? There is no guaranteed timetable. Wisconsin Horticulture reports that pothos cuttings can root in water or vermiculite within approximately three to four weeks, but actual results vary with growing conditions and the health of the cutting. Some cuttings develop roots sooner, while others take longer.
Be patient if the cutting remains healthy but has not yet produced visible roots. If the stem becomes soft, dark, or mushy, inspect it for rot rather than leaving it in deteriorating water indefinitely.
Transferring Rooted Cuttings to Soil
Once your pothos cutting has developed a healthy root system, you can transfer it to potting mix. The important thing is to avoid damaging the new roots and to provide suitable moisture while the cutting adjusts to its new growing medium.
Use the following process:
- Check the roots. Look for several healthy roots rather than relying on the number of days the cutting has spent in water. Roots a few inches long are a useful practical indicator, although smaller, healthy root systems can also be transplanted carefully.
- Prepare a suitable pot. Choose a small container with drainage holes and fill it with a loose, well-draining houseplant potting mix.
- Make a planting hole. Create enough space to position the roots without bending or forcing them into the soil.
- Position the cutting correctly. Place the roots and the lower node in the growing medium, keeping the leaves above the soil surface.
- Firm the mix gently. Add soil around the cutting to hold it upright without compressing the medium tightly.
- Water and drain. Water the mix to moisten it evenly, then allow excess water to escape through the drainage holes.
- Provide suitable conditions. Keep the cutting in bright, indirect light and monitor the soil moisture while the roots establish themselves in the new medium.
The University of Vermont Extension propagation guide recommends transferring rooted cuttings to an appropriate soil mix in a container with drainage. The guide also notes that roots can take different amounts of time to develop depending on the plant, light, and propagation method.
After transplanting, keep the potting mix lightly and evenly moist while the cutting adjusts, but do not leave it waterlogged. Water-rooted cuttings may temporarily show signs of stress after moving into soil, so avoid responding to every drooping leaf by adding more water.
Once the cutting begins producing healthy new growth, care for it as you would an established pothos plant.
If you want a fuller-looking plant, you can eventually grow several rooted cuttings together in one appropriately sized pot. Wisconsin Horticulture specifically recommends planting several rooted pothos cuttings in a single container. This is a practical way to create a fuller arrangement without waiting for one vine to branch extensively.
Other Common Pothos Problems and Their Solutions
Beyond yellow leaves, pothos can develop brown or black leaf edges, lose their distinctive variegation, produce long, sparse vines, or become infested with common houseplant pests. The most effective solution depends on identifying what is causing the problem rather than treating every symptom the same way.
Wisconsin Horticulture’s pothos care guide identifies excessive or inadequate watering, fertilizer buildup, low light, temperature changes, and insect pests among the common problems affecting pothos. Use the following guidance to narrow down the cause and choose an appropriate response.
Brown or Black Leaf Edges
Brown, crispy, or blackened leaf edges can result from inconsistent watering, excess fertilizer salts, or environmental stress. The pattern of damage and the plant’s recent care history can help you distinguish between these possibilities.
According to Wisconsin Horticulture, blackening at leaf tips or margins can be associated with overwatering, underwatering, or excessive fertilizer. Sudden temperature changes can also cause scattered brown patches, sometimes near the center of a leaf rather than along its edges.
Check these factors before making changes:
- Dry, crispy edges: Check whether the potting mix has been drying out for too long between waterings. Prolonged dryness can contribute to leaf-edge damage.
- Blackened margins with persistently wet soil: Inspect drainage and consider whether the roots are experiencing excessive moisture.
- Damage following frequent fertilizing: Review your fertilizer concentration and feeding schedule. Excess salts can injure roots and foliage.
- Scattered brown patches after a temperature change: Consider whether the plant has been exposed to cold drafts, an unusually cold window, or an abrupt change in temperature.
Correct the likely cause first. Adjust watering according to soil moisture, improve drainage if needed, or pause fertilizer if excessive feeding is suspected. Move the plant away from drafts and extreme temperature fluctuations when environmental damage seems likely.
Existing brown or black tissue will not turn green again. You can trim damaged edges or remove badly affected leaves with clean scissors, but avoid removing healthy foliage unnecessarily. Monitor subsequent growth to determine whether the underlying problem has been resolved.
Loss of Variegation
If your golden pothos starts producing mostly green leaves instead of its usual yellow-and-green patterns, insufficient light may be responsible. Wisconsin Horticulture identifies low light as a cause of reduced variegation in pothos.
Variegation refers to the contrasting colors or patterns on a leaf. Depending on the cultivar, these may appear as yellow streaks, cream-colored patches, or contrasting shades of green.
To help maintain the plant’s characteristic appearance:
- Increase indirect light gradually. Move the plant to a brighter location where it receives suitable indirect light without prolonged exposure to intense direct sunlight.
- Check the growth pattern. If new leaves are becoming less variegated while the stems stretch toward a window, inadequate light is a plausible explanation.
- Consider the cultivar. Different pothos varieties naturally produce different amounts and patterns of variegation. A solid-green variety will not develop the same markings as a golden or cream-variegated cultivar.
- Watch new leaves. Existing foliage may retain its original pattern, so evaluate whether leaves produced after improving the lighting show better coloration.
The Penn State Extension pothos guide explains that low light can reduce the desirable variegation or brightness of pothos foliage. Brighter indirect light may help preserve the characteristic pattern, although the response depends on the cultivar and growing conditions.
Avoid moving a plant straight from a dim room into intense direct sunlight. The goal is to provide enough light to support healthy growth without scorching the leaves.
Sparse Growth and Bare Vines
Long stems with widely spaced leaves or bare sections can make a pothos look thinner than expected. This does not always mean the plant is unhealthy, but it can indicate that the growing conditions or pruning routine need adjustment.
Pothos naturally produces trailing vines, and older sections can become relatively bare as the plant develops. Low light may also contribute to stretched growth and reduced foliage quality.
To encourage a fuller appearance:
- Review the lighting. Provide bright, indirect light so new growth has suitable conditions.
- Prune selectively. Shorten overly long vines by cutting just above a suitable node. This can encourage new shoots and help maintain a more compact shape.
- Propagate healthy sections. Take cuttings that contain viable nodes, root them in water or a suitable rooting medium, and plant established cuttings back into the pot when appropriate.
- Check root and soil health. If growth remains weak, examine drainage, soil moisture, and root condition before assuming pruning alone will solve the problem.
Wisconsin Horticulture’s pothos guide recommends selective pruning to control vine length and promote new growth. Planting several rooted cuttings in the same container can also create a fuller arrangement.
Pruning improves shape, but it cannot compensate for insufficient light or unhealthy roots. Address those conditions first, then use selective trimming and propagation to achieve the appearance you want.
Mealybugs, Scale, and Spider Mites
Pothos is generally easy to maintain, but it can occasionally attract mealybugs, scale insects, or spider mites. These pests feed on plant tissues or sap and can weaken the plant if an infestation spreads.
The first step is to identify the pest correctly. Different insects and mites may require different treatments, and unnecessary pesticide applications can create additional problems.
Mealybugs often look like small white, cottony masses. Check the joints where leaves meet stems, the undersides of leaves, and other protected areas. They may also leave a sticky residue called honeydew.
Scale insects can resemble small brown, gray, or pale bumps attached to stems and leaves. Some produce honeydew, which can leave foliage and nearby surfaces sticky.
Spider mites are extremely small and may be difficult to see without magnification. Look for fine webbing, tiny moving specks, or a stippled appearance on the leaves. Inspect the undersides carefully, particularly when the foliage looks dull or damaged.
These identifying features are described in Wisconsin Horticulture’s pothos guide and the University of Minnesota Extension’s guide to managing insects on indoor plants.
Once you identify a likely pest, take the following steps:
- Isolate the affected plant. Move it away from other houseplants to reduce the risk of spreading the infestation.
- Inspect the entire plant. Check both sides of the leaves, the stems, leaf joints, and the container. A magnifying glass can help reveal small pests.
- Remove manageable infestations. Wipe the leaves with a damp cloth or rinse the plant thoroughly. Small numbers of mealybugs can be removed with tweezers or a cotton swab dipped in rubbing alcohol, taking care not to damage the foliage.
- Prune heavily infested sections if necessary. Removing badly affected leaves or stems can make the remaining plant easier to treat.
- Use a suitable treatment if pests persist. Choose an insecticidal soap or another product labeled for the identified pest and indoor plant use. Follow the label instructions, including any precautions and repeat applications.
The University of Minnesota Extension recommends early inspection, isolation, washing, and physical pest removal as useful management measures. It also cautions against homemade soap mixtures, which can damage plants.
Check the pothos again after treatment, including new leaves and hidden stem joints. One cleaning may not eliminate every pest, so continue monitoring and repeat treatment only as directed by the product label.
Use this quick-reference table to connect common symptoms with practical next steps.
Observable sign | What to investigate | Recommended action |
|---|---|---|
Brown or black leaf edges | Watering problems, fertilizer salt buildup, or temperature stress | Check soil moisture, drainage, fertilizer history, and recent temperature changes |
New leaves have less variegation | Insufficient light or natural differences between cultivars | Provide brighter indirect light and monitor new growth |
Long, sparse vines with widely spaced leaves | Low light, natural vine growth, or poor growing conditions | Improve lighting, prune selectively, and check root health |
White, cottony clusters on stems | Mealybugs | Isolate the plant and remove pests; use an appropriate labeled treatment if needed |
Brown or gray bumps attached to stems | Scale insects | Inspect the plant closely, remove manageable infestations, and monitor for recurrence |
Fine webbing or tiny speckles on leaves | Possible spider mites | Inspect leaf undersides, rinse foliage, and use a suitable treatment if confirmed |
The central principle is to identify the likely cause before treating the symptom. Brown edges do not automatically mean the plant needs more water, sparse vines do not always need aggressive pruning, and damaged foliage does not by itself confirm a pest infestation. Check the growing conditions and inspect the plant carefully before deciding what to change.
Popular Pothos Varieties and Their Care Differences
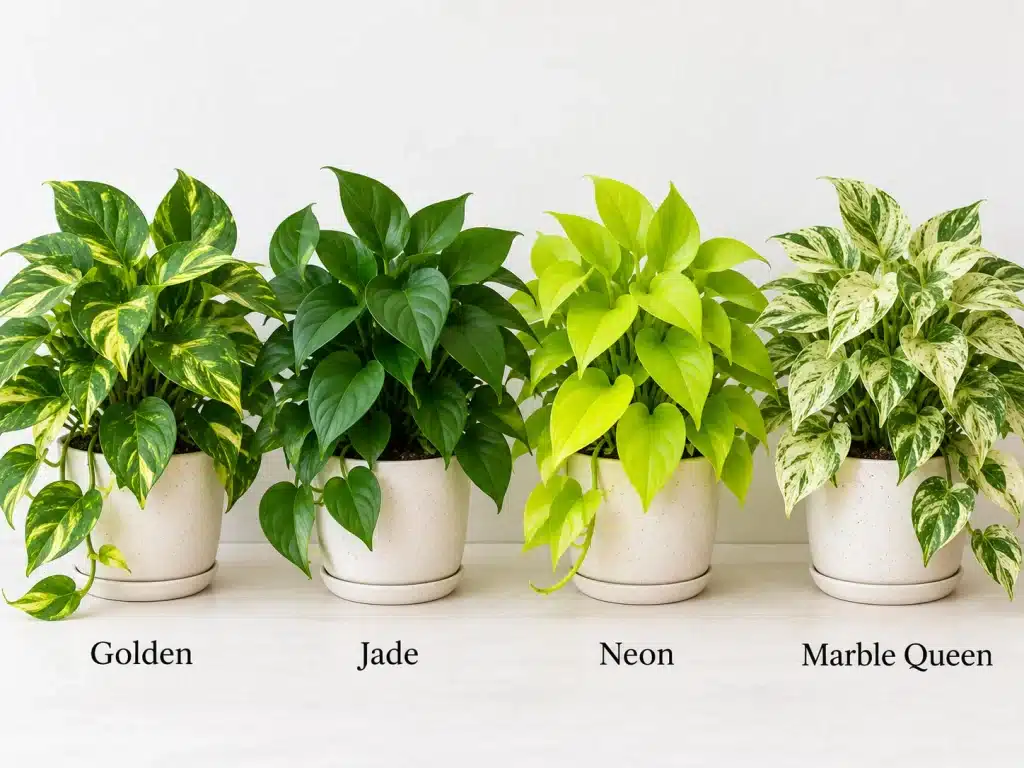
Pothos comes in several popular varieties, each with its own leaf colors and patterns. Golden pothos has yellow-and-green variegation, Jade pothos features solid dark-green leaves, Neon pothos stands out for its bright chartreuse foliage, and Marble Queen has distinctive white or cream marbling.
According to Wisconsin Horticulture’s guide to pothos varieties, these cultivars differ in their natural foliage coloration and variegation. Although their appearance varies, they generally benefit from the same basic pothos plant care: suitable indirect light, well-draining soil, appropriate watering, and warm indoor conditions.
Golden Pothos
Golden pothos is one of the most recognizable varieties, with green, heart-shaped leaves marked by irregular golden-yellow streaks and patches. The amount of yellow varies between leaves, giving each vine a slightly different appearance.
Provide bright, indirect light to support healthy growth and maintain attractive variegation. In low light, new leaves may develop less pronounced yellow markings and appear predominantly green.
A leaf with more green than its neighbors is not necessarily unhealthy. Look at the overall growth pattern before changing the plant’s care routine.
Jade Pothos
Jade pothos has glossy, solid dark-green leaves without the prominent yellow or cream patterns found on variegated varieties. Its naturally uniform green foliage makes it easy to distinguish from Golden and Marble Queen pothos.
Wisconsin Horticulture identifies Jade as a solid dark-green cultivar that performs well in lower-light areas. However, tolerating lower light does not mean that the plant will grow equally vigorously in a dim room. Bright, indirect light remains a useful choice for supporting healthy growth.
Because Jade pothos naturally has solid-green leaves, the absence of variegation is not a sign of a problem. Investigate changes such as widespread browning, wilting, or declining growth rather than expecting yellow markings to appear.
Neon Pothos
Neon pothos is known for its striking, bright yellow-green or chartreuse leaves. Unlike Golden pothos, which has contrasting yellow patches against darker green foliage, Neon typically displays a more uniform, luminous color.
Its naturally bright foliage can make it appear yellow-green even when the plant is perfectly healthy. Compare new leaves with the plant’s established coloration before assuming that a color difference indicates nutrient deficiency or another problem.
Provide bright, indirect light and monitor the condition of the foliage. Avoid intense direct sunlight, which can scorch leaves. Neon pothos does not need to develop dark-green leaves to be healthy; its characteristic bright color is part of the cultivar.
Marble Queen Pothos
Marble Queen pothos has green leaves streaked and marbled with white or cream, often creating a more extensive variegated pattern than Golden pothos. Individual leaves can contain different proportions of green and pale coloration.
This variety benefits from bright, indirect light to support healthy growth and help maintain its distinctive markings. Low light can contribute to reduced variegation, as documented by Wisconsin Horticulture.
Do not confuse the cultivar’s natural cream-white patterns with unhealthy yellowing. Normal variegation follows the leaf’s characteristic pattern, while unusual discoloration accompanied by wilting, brown patches, or declining growth deserves closer inspection.
The amount of variegation can vary from one leaf to another, so a single greener or whiter leaf does not automatically indicate a problem.
How to Tell Natural Coloration From a Plant Health Problem
When caring for different pothos varieties, consider the plant’s natural coloring before diagnosing a problem. Golden pothos is supposed to have yellow markings, Neon pothos naturally has bright yellow-green foliage, Marble Queen displays pale marbling, and Jade remains predominantly dark green.
Use these distinctions as a starting point:
- Golden pothos becoming greener: Check whether the plant receives enough indirect light, particularly if newer leaves have less yellow variegation.
- Jade pothos without yellow markings: This is normal for the cultivar. Focus on overall leaf and stem health.
- Neon pothos with bright chartreuse leaves: This is its characteristic coloration, not automatically a sign of nutrient deficiency.
- Marble Queen with white or cream patches: These patterns are normal. Reduced variegation in new growth may warrant reviewing the light conditions.
- Any variety developing widespread browning, persistent wilting, or unusual leaf damage: Investigate watering, drainage, light exposure, temperature, and possible pests before applying fertilizer or other treatments.
For most households, there is no need to create a separate watering or fertilizing schedule for each of these four varieties. Start with the same general care principles, then adjust according to the plant’s light exposure, growth, and soil moisture.
Choosing the right variety is largely a matter of appearance: Golden for yellow-and-green patterns, Jade for deep green, Neon for vivid chartreuse, and Marble Queen for creamy marbling. Understanding those natural differences makes it easier to recognize genuine signs of stress without treating healthy foliage as a problem.
Is Pothos Toxic to Cats, Dogs, and Children?

Yes. Pothos (Epipremnum aureum) is toxic to cats, dogs, and humans if chewed or ingested. The plant contains insoluble calcium oxalate crystals, which can irritate the mouth and digestive tract. Although many exposures cause localized irritation rather than severe poisoning, symptoms can occasionally become serious, so prevention and appropriate first aid matter.
Wisconsin Horticulture’s pothos care guide confirms that pothos contains calcium oxalate and can cause a burning sensation in the mouth when ingested. The ASPCA’s Golden Pothos toxicity profile also identifies the plant as toxic to cats and dogs.
Symptoms in pets may include oral pain, excessive drooling, pawing at the mouth, vomiting, and difficulty swallowing. In children and adults, chewing pothos can cause immediate burning or irritation of the lips, tongue, and mouth. Contact with the plant’s sap may also irritate the skin.
To reduce the risk of exposure:
- Keep pothos out of reach. Place trailing vines where curious pets and young children cannot chew them or pull them down.
- Dispose of clippings safely. Keep freshly pruned stems and fallen leaves away from pets and children, particularly during propagation.
- Wash your hands after pruning. Avoid touching your eyes or mouth while handling damaged stems or leaves.
- Respond appropriately to suspected human ingestion. Gently remove any visible plant material from the mouth and rinse the mouth with water. Do not induce vomiting or force fluids. If the person is awake, alert, and able to swallow normally, a small amount of water may be appropriate; Poison Control’s first-aid guidance explains these precautions. Contact Poison Control for case-specific advice.
- For suspected pet ingestion, contact your veterinarian or an animal poison-control service for advice.
If a child or adult chews or swallows pothos, contact a poison-control center for case-specific guidance rather than waiting for symptoms. In the United States, Poison Control is available free of charge at 1-800-222-1222. For a pet that may have eaten pothos, contact your veterinarian or ASPCA Animal Poison Control for advice; fees may apply.
Swelling of the mouth or throat, difficulty swallowing, or trouble breathing requires urgent medical or veterinary attention, as appropriate. Do not assume that every exposure will cause severe illness, but do not dismiss symptoms that are worsening.
With sensible placement and careful handling, you can still enjoy pothos as a houseplant while reducing the chance of accidental exposure.
Successful pothos plant care starts with understanding what your plant needs rather than following a rigid routine. Check soil moisture before watering, provide bright, indirect light, and maintain healthy roots with an airy, well-draining potting mix. When problems appear, investigate the likely cause before applying fertilizer or other treatments. Regular pruning and propagation can help you shape a fuller, healthier plant over time. Finally, keep pothos and its clippings out of reach of pets and young children, since its calcium oxalate crystals can irritate if chewed or ingested.
Indoor Plant Care: Complete Beginner’s Guide to Healthy PlantsDracaena Plant Indoor Care: Light, Watering & Common ProblemsNight Blooming Jasmine Plant Guide: Zones, Care, SafetyIndoor Plant Care: Complete Beginner’s Guide to Healthy Plants


Thank you for your sharing. I am worried that I lack creative ideas. It is your article that makes me full of hope. Thank you. But, I have a question, can you help me?
Thank you so much for your kind words—I’m really glad my article gave you hope and inspiration. It’s completely normal to feel like you’re lacking creative ideas sometimes; creativity often comes in waves. I’d be happy to help with your question. Please go ahead and share it, and I’ll do my best to give you a clear and useful answer.
I don’t think the title of your article matches the content lol. Just kidding, mainly because I had some doubts after reading the article.
Your point of view caught my eye and was very interesting. Thanks. I have a question for you.